Thursday, December 23, 2010

RAGGY OR SHAGGY?

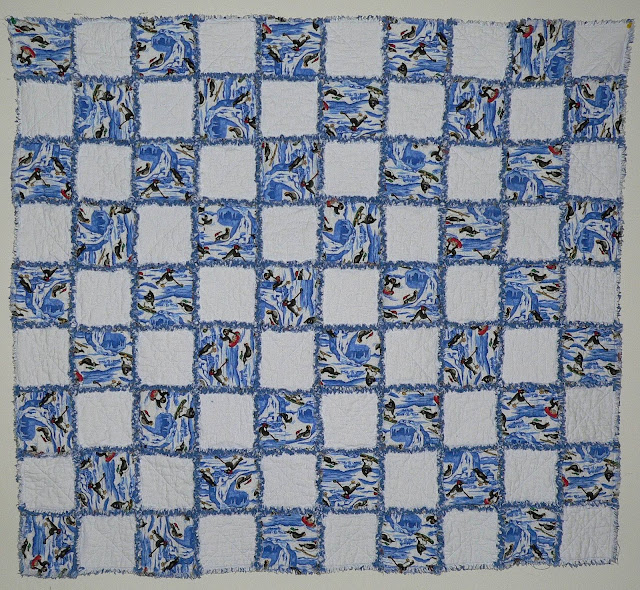
A rose is a rose, by any other name ...  It's the same with this technique of quilting.  When I saw my first one I nicknamed it "Shaggy".  There are many tutorials all over the Internet explaining how to make a Rag quilt.  I was intrigued when I first read about them but didn't want to waste a bit of my good expensive flannel and find out I despised this method (this happened with a stack and whack quilt!).  Instead I used old PJ's, old sheets, old flannel shirts, I even used scraps of batting (different weights and fiber contents).  It was the quilt that hooked me.  This sample quilt was confiscated by my husband, who sleeps under it every night  and sometimes carries it into the TV room.  It is the softest shaggy I have ever made. BTW, A month later he decided it wasn't long enough and asked me to add 2 more feet to it.  This was the first and last time I have or will add another row to a shaggy.  An already clipped and washed shaggy is a night-mare to sew another section to. 

I love to make them.  I have learned several tricks to keep them from getting boring (I have made over 100 of them). I will share what I have learned with you. 

This is one of the most recent Shaggies I have made.


It was made from scraps and stash.  Even the batting was scraps from the sides of quilts I had quilted on the quilt machine.  On the back is the last of 4 flannels I had in the stash (Dark blue, light blue, mint green and white).  The front is blue flowers with green leaves,  When you use a color on the back of the shaggy it shows through in the clipping very pastel from the original colors.

I am a big on, not wasting fabric.  I want to use every square inch.  I  decided to try 5/8 inch seams (instead of 1 inch) and clip seams every 1/8 inch (instead of the 1/4 inch or more suggested).  A narrower seam and closer clipping gave a chenille like feel to the exposed seams of the quilt.  Making them softer looking with a less peasant look.
This shaggy was made at the same time as the other quilt.  Hurray, my stash is totally void of all these flannels.  I used the Dark blue on the back. Solid dark colors on the back give an outlined look to the blocks on front.  Paring down my stash is my main objective during this strained economy (also a good excuse to buy more if I don't have the color I need..lol).

What size do I make the blocks:

How do I decide on the size of the blocks?  This is usually decided by the width of the fabric.  I divide the width and decide which size square will make the best use of the fabric and not have left over flannel, which I feel guilty about throwing out.  The other consideration is if I have a limited amount of the flannel I use the largest size I can cut, this means I will have less wasted yardage in the ragging of the quilt. (baby quilts will be so fancy when made with tiny 4 inch blocks and no batting, but you will be clipping for what seems forever...lol)  Needless to say the only fancy baby quilt I made was for my first granddaughter.

If I am making a New-Born's shaggy I like to use 5 inch blocks (this size has lots of clipping too), no batting (double flocked flannel makes the nicest new born shaggies).  Double flocked is what I call flannel that is fuzzy on both sides.  When you use this kind of flannel it is totally unnecessary to add batting, especially if using the smaller blocks.  When making a New-Born's shaggy you might consider a poly batting.  The reason I suggest this is because it is warm and very lightweight.  You don't want to have a heavy quilt for the baby  (This is also a point to consider if you are making a quilt for the elderly or someone convalescing).  I haven't been batting shopping lately.  There may be new very light weight cottons available or possibly the new bamboo ones come in the lighter weights.  I am all for using only products from renewable plant resources.  I have also found the expensive tightly woven flannels getting an even harder finish when washed and do not give a soft shaggy. 

Daughter's King Size Shaggy, front and back (2 rows are over the back of the fence.)
I made the King/Queen size shaggy for my Daughter from from expensive flannels and I used 100% thin cotton batting.  The quilt is so heavy it can not be washed in a home machine.  It is coming up ten years old and it still does not have the softness I prize in my Shaggy quilts.  This quilt was one of my first Shaggies.  I used the 1 inch seam allowance.  Harder finished flannels and those that are tightly woven do not fray as nicely.


Constructing a Shaggy:


When I make my blocks, I stack the sandwiches (the front and back fabric with the batting)  together before I start.  When I start Xing them I only "X" the amount I need for one row the length of the quilt.

I go back and pair them, until the whole row is finished.  I proceed to do the next row and then join the two rows.  I do this until I finish 1/2 the quilt (On a small quilt 48"(or less) I just "X" all the blocks first).  I began doing this to keep it from getting interminably boring. It seems to go faster.  Today I was clipping a king size shaggy I had put together last year, (we had been using it unclipped).  It reminded me how nice it was to clip half at a time when I was making them.  A Shaggy quilt this size is very hard to hold on your lap and clip.  My recommendation if making bed size shaggies is you make half at a time leaving the joining rows unclipped, then join the two halves and clip the two rows .


When Xing the blocks I use a larger stitch (why waste the thread). There is no stress on this part of the block, the stitching is just to hold the batting in place.  Some people use a walking foot.  I have found just a light tug as I am feeding the block through does the trick.  (If you get a wrinkle..it's not going to show when it is washed and shrinks up.) Another Thread hint; do not use old thread.  When you go to shake the lint out of the heavy wet quilt the thread will break. (King/Queen size need two people to shake them)

When joining a row of blocks to another row I always back stitch three times over the seam joint (don't forget to reset the stitch length to medium for stitching the seams).  I open my seams out  flat rather than nesting them.  It seems to make the clipping of the seams where they join easier.

When I join two long rows of blocks, I clip the perpendicular seams loose on both sides of the new seam.  This makes the shag clipping of the seams easier (On a queen size shaggy when you have all that quilt in your lap this is a great labor saver).  It makes it quicker to have all the seams loose so you can proceed to rag the edges. 

Washing the shaggy 

I love a regular agitator washer for Shaggies.  Fill the tub full and put your shaggy and a couple of big towels in (yes it isn't a full load).  You want it on the heavy cotton cycle.  It will really toss that blanket around in the water.  Wash only through one cycle (wash and wring out, stop the washer).  You do not need soap or hot water. Remove the Quilt and towels and take them out side and shake the stuffing out of them, lol, literally.  Return them to the washer (before putting them back in take a rag and wipe out any lint remaining on the sides of the tub.)  Restart the cycle on wash again and repeat the above moves.  I do this 4 times before I put it on a full cycle with hot water and 1/3 of the detergent I would normally use (the item isn't dirty after the four rinsings) and a shout color catcher if I have used solid colored flannels on the back.  After several uses of shout color catchers I am now using 3-4 of them in a wash just to make sure there is no bleed.  Some dark fabrics really bleed heavy...as in reds and purples are notorious.

If you want you can stop the wash during this last wash and shake the shaggy again then return it and finish the cycles (don't forget to shake those towels too).  Now throw it in the dryer with a fabric softener sheet.  check your filter every ten minutes, cleaning it. 

I now have a front loader machine which doesn't let me stop it mid cycle and remove the items.  It's the first time I cursed it.  The front loaded is a fabric pre-washers dream; it does not wrinkle the fabrics.  It does not beat up the shaggies enough so when I go to the dry cycle I put two flannel pillow cases with a pair of tennis shoes tied up inside, in with the shaggy and towels.  This helps to knock out more of the lint that the washer didn't dislodge.  (In the front loader I also run through 4 cycles but only get to shake when they finish.  BTW...don't forget to check the filter on your front loader between each use.)

I hope my suggestions to you, who are new to rag quilt making, helps the experience be more fulfilling.  A rag quilt is a use everyday quilt,  haul on a picnic quilt, throw on the floor, and make a tent quilt.  A cherished quilt by anyone who has one. The biggest plus is if you need a great gift quickly, A small rag quilt with 8 inch blocks can be made and finished in 48 hours or less. 
 
New blog here, a mystery quilt designed by me for my blog:
OCTOBER 2013

Other blog sites by me:
 
Where I have stories of my cats and other pets
a blog about my courtship with my husband,
and a blog about my most embarrassing moment.
A "Soap box" blog where I do air my opinions.
 
blogs about the wildflowers on our farm
Organic methods we use, some cooking and some poetry,
blogs about Seed sprouting, insects, and garden pictures
Blog about an endangered beneficial beetle



Wednesday, December 22, 2010

COOKIE TIME IS ALL THE TIME

I went to look in my past blogs and discovered I had featured "My Favorite Cookie" in a previous blog.  I kid you not, that is the name of the recipe in the cookbook.  It has become a family favorite.  This link will get you to that blog:


I do have other cookies that are favorites and the following one jumps to the head of the line, right behind the above cookie.  I usually make them both at the same time because they are refrigerator cookies.  I make one day, then bake the next.  This recipe was right next to the other recipe in the book.

I found these recipes years ago in "The American Family CookBook"  Compiled by the Culinary Arts Institute in Chicago.  It was published first in 1971 (I have the 1974 edition)  Catalog card number 71-158818.  I recommend looking for this book in garage sales and resale places.  I have found so many great recipes in it. (My favorite herb bread is from here also. Recipe is in a previous blog)

December 3, 2011, Hints:
I have been baking some of the cookies and it occured to me to pass on some hints which I have remembered during this endeavor. 
If you have a convection oven and are using it inconvections mode lower you temps 25 degrees.
Turn your pans at least once during the baking ad exchange the shelves they are on.

"Coconut Classics"

1 cup butter
1/2 teaspoon Vanilla
1 cup sugar
1 egg beaten
2 cups grated coconut
1 3/4 cups sifted all purpose flour
1/2  teaspoon baking soda

1.   Cream butter with extract; add sugar gradually, beating until fluffy.  Add beaten egg and beat well.

2.  Thoroughly blend in 1 3/4 cup coconut.

3.  sift flour and baking soda together; add in fourths to the creamed mixture, mixing well after each  addition.

4.  Knead lightly with finger tips, 5 - 10 times, until the mixture holds together.

5.  Shape into six 1 inch rolls; coat with the remaining coconut; wrap in waxed paper and chill for at least 3 hours.  I do mine overnight (i put all 6 rolls into a plastic bag even though they are wrapper in waxed paper.

6.   Cut each roll into 1/4 inch slices; place 3/4 inch apart on lightly greased cookie sheets. (you'll need a very sharp knife) 12-03-11: I use parchment.  (It isn't necessary but the cookies are very fragile when hot and it makes it easy to pull the sheet of them off the tray and onto the cooling racks.  they cool and are easy to remove after cololing.)

7.  Bake at 325F for about 15 minutes 12-03-11 check 1/2 way through the baking and rotate the tray.

It says it makes about 18 dozen cookies...I don't think I got that many

Wishing everyone the Happiest Holiday and a New year filled with love.


 New Article on my blog: 
"A MYSTERY IN THE MAKING"
A mystery quilt designed with the novice in mind
First Clue to be presented October 16.
 
Other blog sites by me:
 
Where I have stories of my cats and other pets
a blog about my courtship with my husband,
and a blog about my most embarrassing moment.
A "Soap box" blog where I do air my opinions.
 
blogs about the wildflowers on our farm
Organic methods we use, some cooking and some poetry,
blogs about Seed sprouting, insects, and garden pictures
Blog about an endangered beneficial beetle
New Blog:
 
All recipes, pictures, and writings are my own.
I give credit for items which belong to other people in my blogs .
Please do not copy without

Friday, October 22, 2010

HALLOWEEN RE-CYCLED/RE-USED

Normally I only have two costumes to make each year for the grands.  This year I had a requests for 2 more.  Thank goodness I have a big stash and I am a collector.  I am one of these people that saves a sardine can if it is an unusual shape, just in case I find a great use for it. (this example was sitting right here. I just bought some and the tin was really neat.  I think maybe I will try out making a pin cushion with them.)

My first request was from a young lady who recently turned 11.  She wanted to be a gypsy.  She sent a picture email of what she wanted to look like.  I searched the stash for appropriate fabrics for the skirt and blouse.  I wasn't having much luck. If I found the right fabric then it was to small a piece to work.  I knew I'd probably have to run to the resell shop to find something.  Later that day I had to go down to the barn for something and went in the storage room.  There was the metal utility closet.  We had found it in the basement of the building my husbands office is in.  I had totally forgotten about it and it's contents.  Inside it is stuffed full of Square dance costumes.  One of them was black.  It was perfect.  The trim, which is silver, looks like it has Greek designs.  There were several several blouses with lace trim, one of them was perfect size and looks.  I wouldn't have to alter it at all. 
This is her gypsy outfit:
The belt and jewelry were from a box I fill with junk stuff to use if I need beads and rhinestones for beading on things.  The gold necklace is a belt.  she has pierced ears and I found the blue light weight hoops in the box.  The rose holding the skirt is a barrette of mine(remember the 80's with the big bows and such).  I just sewed the skirt to the waist band  and clamped the rose around it.

The scarf came from the stash (picture color is bad it is royal purple). It was actually fabric from a costume I made years ago. I just made a cuff on the long side of the triangle.  That way she could tie it with out it unrolling on her.  The fabric originally was used to make the pants of this Captain Hook costume:
There is a slip for under the black skirt, it has ruffles which show where the skirt is hiked.  It used to be a table cloth from about 15 years ago.  I forgot to take a pix while it was on the dress form. 
I'll have to wait till she tries it on to get a pix showing the entire costume. 
I will say this was the easiest costume I ever put together.

THE FORTH AND LAST COSTUME FOR 2010

My next request came from her nine year old brother.  He wanted to be  "PIT".  This is a picture of "PIT"
His mom bought his wings and is making the boot tops, sword, and head dress.  This one was quite a challenge for me.  I didn't have a pattern, and I didn't have the child to fit it on but I did have measurements. Scrounging through the boxes I found some white chiffon type fabric, it looked like there was enough to make a tunic.  The challenge was in how do you drape a boy so it doesn't slide off as he's running from house to house trick or treating.

I knew there was a belt wrapping it, but that wouldn't hold the slippery outfit on. I decided it would have to be sewn to some kind of sturdy base. Further search of the stash revealed a light weight piece of double knit.  It would be great for constructing a one shouldered undershirt.  I cut it out and hung it on the manikin.  Then cut a length of the chiffon type fabric (enough to drape over the shoulder to mid hip on the back and front).  I laid it on the shoulder and realized I would have to attach it, for the moment I grabbed a shoe lace and tied it on at the shoulder. 

I decided to make a band (like an epaulet) to wrap around the shoulder seam.  I used some gold ribbon to top it with.  I attached it to the collar edge and the arm hole edge.  Then I pulled the fabric through the strap, pinned pleats in it, and then sewed them in.  Replacing the fabric in the strap I took the top edge of the loose fabric and pinned it the entire length of the diagonal cut that went across the body.  This made the fabric drape in folds and when it was tucked in the waist band of the bottom toga and pulled up, it bloused convincingly like it was one piece of fabric to the hem of the bottom toga.  I think I should post a pix so you can see what I am talking about.  This is the finished toga:
The bottom half of the toga is made like a skirt.  It has a casing in the top and wide elastic is laced through it.  I did not permanently install the elastic because I didn't know if it was tight enough or loose enough.  I figured Mommy could adjust it till it was just perfect for him. 

In the pix you can see white showing through the skirt.  It is the tail of the undershirt.  When it gets to the recipient they can trim it to a length it won't show.  It's double knit so it won't fray.

The trim on the skirt tail and the belt is not recycled.  It was 1/4 inch gold ribbon from Walmart.  I used two spools.  They were 97 cents each and held 10 yards each.  I used every bit of the ribbon.  The black underneath the ribbon is a rayon like fabric that I had in the recycle pile.  It was taken off an old bridesmaid dress.  I did not use any inter facing under it because I wanted it to be as soft hanging as possible.  I did cut the strip on the bias.

Next was fashioning the scarf.  I used 18" wide chiffon strips. 
 I made sure one edge still had the selvage on it. 
The chiffon was a 4 yard piece I had bought at the re-sellit shop years ago for 50 cents.
With the selvage I only had to roll hem one edge.

I wrapped the scarf around the manikin where it should be.  I then proceeded to fold pleats in it at the back of the neck and pinned them.  Stitched them tight and put the scarf back on the manikin.  The reason I stitched them down was so the scarf wouldn't slide around on his neck as much as it would if it was loose (hope my theory works..lol).
The belt is the rayon fabric covering a very thick, stiff interfacing.  Sorry I can't say what kind.  It was the left overs from purse making I did several years ago.  The belt is wide. 
If the 9 year old wants it thinner all he has to do is fold in to the width he wants.

Making the arm guards was just a matter of converting the dimensions of wrist measurement, fattest part of fore arm measurement, and the length of the forearm from wrist to the inner elbow minus one inch.  I needed to add approximately 1 inch to either side for over lap.   I used the same heavy interfacing which I used in the belt.  I covered both sides with felt (I think covering one side would have been enough).  I used some bright gold cotton fabric to put bands on to simulate the metal bands on the picture's guards.  There is a shield on the left hand guard. I couldn't tell the design on it so I made one up. 
I used velcro on the overlaps to close the guards. 
When I was in the dollar store I found glow in the dark bracelets that mimic the ones in the pix.

With a pattern and left overs anyone can make great costumes, albeit you will have to take the time.  You will have frustrations when something doesn't turn out the way you expect.  Try to remember these are for children, this is for one day use, and it is supposed to be a fun day.  You are making the costume to please your children.  Also remember these words of wisdom come from a person who has trouble remembering her own advice.  Thank you for stopping by to check out what I am creating.
 
 New Article on my blog: 
"A MYSTERY IN THE MAKING"
A mystery quilt designed with the novice in mind
 
Other blog sites by me:
 
Where I have stories of my cats and other pets
a blog about my courtship with my husband,
and a blog about my most embarrassing moment.
A "Soap box" blog where I do air my opinions.
 
blogs about the wildflowers on our farm
Organic methods we use, some cooking and some poetry,
blogs about Seed sprouting, insects, and garden pictures
Blog about an endangered beneficial beetle
New Blog:
 
All recipes, pictures, and writings are my own.
I give credit for items which belong to other people in my blogs .
Please do not copy without permission

Friday, October 15, 2010

HALLOWEEN HOMEMADE

I have been gone from here too long.  The garden has kept me away.  In these economics I have not been able to afford additional help.  This made for a summer of dawn to dusk dirt digging  by yours truly.  I have taken a hiatus the last two weeks (the garden is on the wane). 
I am making Halloween costumes for the grands. 
You can see some of the previous costumes :

I am very big into recycle/reuse.  This year is no exception.  I love making costumes for the kids, but it is a challenge with them in Florida and me in the St. Louis area.  First, getting them to decide what they want to be in plenty of time to construct a costume is the hardest.  When that is accomplished getting our daughter to send the measurements via email is another obstacle.
 I will say, this year mine did an excellent job of responding.

My grandson, who is 9, wanted to be a scary person (along the lines of Freddie Krueger).  I told my Dd she could get something together with the sports stuff they have laying around and real clothes.  While I was working on the granddaughter's costume it occurred to me he would be a little miffed if she got a homemade costume and he didn't.  That evening, while we were having dinner, there was an advertisement on the history channel for the new show "Swamp People".  It's light bulb time.  A swamp monster (person) would fit the bill as a scary person.  I had the perfect material in my stash to make the basic costume.
 It is camouflage flannel fabric.

The next problem I had to tackle was finding an appropriate pattern. It would have to have a hood.
Since I don't have the child to fit and construct it on I did need a pattern. 
A trip to wally world solved the problem.  I picked out this penguin pattern.

Here is my version of a "Swamp Monster":

The manikin is topped with a rolled up towel for a head.  Besides the pattern I had to purchase plastic bugs.  The only place I found real looking bugs was at a local "Dollar General Store".  They had black widow spiders and roaches.  You can't really see the roaches because they blend in with the camo cloth (in person you can see them).  The only other place I could find real looking creepy bugs was
the bait and tackle shops and that was horrendously expensive.

The mask (nose) was made with a paper dust mask that you use when spraying or in conditions that are extremely dusty.  I just winged it when cutting out the nose and stuffed it with junk batting. The nose looks like that character named Alph (sp) that was on a 70's sitcom.  Since the mask is a paper/cloth kind it was very easy to hand stitch the nose on.  I probably could have use the machine to do it,
but I wanted to be able to add stuffing as I went.

The scraggly stuff that is supposed to look like moss and grungy water vegetation hanging from the clothes (as if he rose up out of the creek) is made from any fabric I could find that I could shred when I ripped it.  I used illusions, nylons and even double knits.  As you can see I used the wings on the penguin pattern. 
The base of  the costume I made trailing (no leg openings), it drags on the ground like a wizards robe.  
The idea is that it would look like he was just rising out of the ground.

Grandson is a man of few words, upon seeing his costume it was, "Cool".

"I WANT TO BE A DOG! OR A SCARY PERSON." 

This is the answer to the question I asked my 8 year old granddaughter. Which I followed with, "Do you want to be scary or do you want to be a sweet little puppy dog that everyone wants to give treats too?"  She answered the dog.  Then I asked her what kind of dog.  She didn't know so I asked, "Do you want standing up ears are long floppy ears." She said long floppy.  I went trolling on google for floppy eared dogs and the first image to pop up was basset hounds.  This was very appropriate because her Uncle had 4 basset hounds.  I sent her the picture and she emailed me back that that was cool.

The first necessity was a pattern; something with a separate hood and a onesie pajama type construction. 
I found this pattern at Walmart:

The second necessity was the basic fabric for the dog.  It needed to be light and drapey.  It needed to have a nap.  Nothing filled the bill so it was a trip to the fabric store.  There I found a cloth with no name.  I think it is a sueded nylon/rayon.  It was like a silky flannel.

I had to re engineer ears for it.  I kept referring to the picture of the basset I found through google. 
This is the dog I used for my model: 
and yes, I used poetic license to interpret the picture.  I used the same technique for the nose that I used in the swamp monster.  I had to make my own pattern for the ears and had to stuff them as I attached them.
Recycling:  Yes I bought the basic fabric for the dog (that's the tan ) but everything else is recycled or from stash. The ears are the winter lining to an old trench coat from the 50's.  The black on the nose is a fur collar.  The jowls were added as an after thought when I completed the costume.  The white is a bed pad to keep people from getting bed sores.  It had out lived its usefullnes in that capacity. 
The lining in the hood is lining fabric taken from the slip of an old wool skirt.
The black on the back is theinsulated liner from another old winter coat which had long ago left this earth. 

All the fur pieces were put on in small sections and laced together.  They had to be strips cut to the curve of the body or they would have been to stiff to hang correctly when the suit was put on.  Due to the difference in fabrics they had to be stitched on by hand.  It was tedious work.   The tail is stuffed really tight and the fur was added after it was stuffed.  I did not put elastic in the wrists and ankles because I wanted it to give the effect of the naural appendages, not to look like clothes.

The Zipper in the front was recycled from a man's cotton overalls.  It was 30 inches long. 
I had Hunny take tin snips and cut it off at 20 inches and then I bar tacked by hand the base of it.
This is the finished Basset hound.  Hunny said it reminded him of Huckleberry hound, LOL.
Grandaughter has received the dog, and she said it was perfect.  Mom says the nose is too heavy for the elastic that came with it so she will have to get some quarter inch elastic and attach it.
I will have to say adios for this installment.  I need to return to making two more costumes. 
Thank you for peeking in.

The following is the two more costuumes I made:
http://gloriouscreations.blogspot.com/2010/10/halloween-re-cycledre-used.html

This is the costume from 2011:
http://gloriouscreations.blogspot.com/2011/10/halloween-ninja.html

 New Article on my blog: 
"A MYSTERY IN THE MAKING"
A mystery quilt designed with the novice in mind
First Clue to be presented October 16.
 
Other blog sites by me:
 
Where I have stories of my cats and other pets
a blog about my courtship with my husband,
and a blog about my most embarrassing moment.
A "Soap box" blog where I do air my opinions.
 
blogs about the wildflowers on our farm
Organic methods we use, some cooking and some poetry,
blogs about Seed sprouting, insects, and garden pictures
Blog about an endangered beneficial beetle
New Blog:
 
All recipes, pictures, and writings are my own.
I give credit for items which belong to other people in my blogs .
Please do not copy without permission

Monday, March 15, 2010

THOSE SWIMMING SUITS

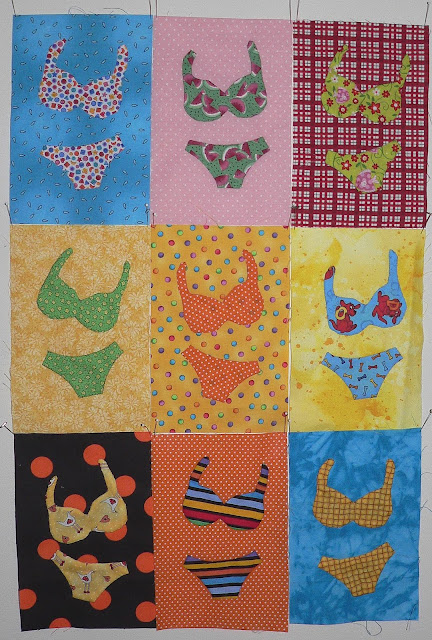
Working on the Swim suits during the olympics was a breeze.  Made the time go faster.  We also recorded them so we didn't have to endure the commercials.  I decided to make twelve of them instead of the nine I originally planned.  I was glad I did when a week later I placed them on the floor to see if  I would want to sash them or not.  Whoops, right before my eyes I see a glaring mistake.  I appliqued two of the same suits on different fabric.  I must really like that fabric, LOL.  Looking at them I decided to make a pillow with 3 of them    The following pictures show the probable lay out.


I will be sashing the pillow.  I found in my stash some small pebble like fabric that may work.  It is only a fat quarter.  I might use a tiny border with it and then a large border which looks like water surrounding it.  I want to applique my granddaughter's name on the bottom border and her birth date on the top border.  The reason I really wanted a wide border of sand is I wanted to applique some flipflops on the sand.  I will keep looking for good sand.  I have till August to finish this.  I also ask my Dd to send a copy of her foot prints when she was born.  I thought I would enlarge it and place it in a corner block on the wall hanging.

I want use only Stash fabrics if I can.  I have so much fabric it is unconcienable to buy more in this economy.  the following picture is a possible layout for the pillow. 

These are all twleve of the suits.  Grandaughter will be 8 in August and she is as crazy for swim suits as she was at 18 months.


Monday, February 15, 2010

SWIMSUITS ON PARADE


While the snow is falling here and the rain is coming down in Vancouver, I am doing the dreaded "A", working on blocks for my grandaughter.  She is obsessed with Swimsuits. When tiny it was her uniform of choice.  She even wore one to breakfast.  I believe she would have slept in one if Mom had let her.  Living in Florida makes the obsession a little bit more understandable. 

While the Olympics continue so shall I, Keep watching for more bikinis. 

Each of the blocks are 6" X 9".  The pattern, I believe, is a Pat sloan one.

Thursday, February 11, 2010

ANOTHER UFO

Tomorrow I take hunny for his colonoscopy.  It is just a base line; he'll be seventy years old this year.  I will need to sit and wait while the procedure is done.  We will arrive at eight AM and the proceedure won't start until nine.  I have no idea how long I will have to wait.  It was nescessary to find something to do.  For me, reading is out of the question in these situations.

I happened to be in a non quilting closet and saw a box I didn't remember what was in it.  When I opened it it was a UFO.  I had cut out the block pieces and even started to assemble one of them.  I was thrilled with the idea of working on it.  Delving deeper in the box I realized the pattern was there (I usually put patterns in the box with my "pigs".  This was a free pattern I had found on the internet. I figured I could go back and find it.  NOT!  I couldn't even remember the site where it had been.   I queeried my internet friends if they remembered it; so far I have had no one respond.  I decided to take the already cut out pieces and scan them.  It worked.  I have now made my templates so I can make more blocks.  right now I only have 7 blocks cut out.  To make a nice wall hanging I need at least 8 possibly 10.  It will be acording to how I decide to lay out the blocks and what I pick for a center block and the borders.

The applique on these blocks is to be needle turn. 

The picture at the beginning of the blog is the block I started  3 years ago.  As I work on each block I will post it. 

Saturday, February 6, 2010

WE'VE GOT MAIL, MOM!


I have been busy lately trying to find something to send to the grands each month.  Three years ago I sent them pillow slips each month for their travel  pillows. Each was made in the theme of the month.  When Halloween came around I was able to find some glow in the dark star fabric.   They loved those.  The following year I made them place mats to use each month.  Last year I made full size pillow slips.  This year I hadn't found anything I thought would be something they could use until I came across a blog where someone had made mailbox covers.  These were weather proof.  I don't have fabrics available right now in the weather proof line and I am not where I can get the exact fit for the box so I am winging it.  My Grandson will be 9 this month so I thought I would give this idea a trial run.  I asked my daugther to take time and measure the box for me.  Why is it like pulling eye teeh to get our kids to do something?  It was a week before she got back to me with the measurements.  They are always so busy.  It a cinch I couldn't go measure it.  She's a Thousand plus miles away.


A trip to the stash to find the appropriate fabrics was the next thing to do.  I found this great Denim fabric that is canvas weight.  I figured it would be heavy enough the wind wouldn't blow it around.  Then I searched for my "stitch witchery".  It has been so long since I did any iron-on that I knew it was buried under other "material things".  In fact I usually stay away from iron on.  I am a little bit of a snob when it comes to iron on stuff.  I would rather hand applique.  I decided since it wasn't going to be a cover to stay out in the weather for a month that I would also make the appliques out of felt.  I would be able to use the little bits and pieces that had been migrating around in the stash. 

The first thing I did was to cut the canvas 3 inches wider and 3 inches longer than I needed.  Then I hemmed the sides so the fabric was to be the length of the box   Then I measured for over the hump of the box and pressed a fold that would be the part that would go under the box.  After that was done I hemmed the one side with a rolled hem.  With the heaviness of the fabric I had to press the first fold and stitch it down with a basting stitch on the machine.  Then go back and press another fold and stitch again.  I could have serged it but my serger and I are always at war and I was not in the mood for a frustrating fight.

The next step was to place the hole for the flag and the slice so the flag could slip in. I drew it on the fabric and proceeded to heavily zig zagged the area.  Then I clipped out the hole  and zig zagged some more before I clipped the slice for the flag.

Now for the design.  I didn't want to obsess over this, I just wanted to get it done and in the mail before the birthday was over and gone.  I didn't even make patterns for the pieces.  I just cut them out and set them on the fabric.  On the first side I used the stitch witchery clipped in little bits to hold the pieces on.  I will tell you this, it was a pain in the "A" to iron the pieces.  I just wanted them to hold on till I could widely zig zag around the pieces.  On the opposite side I thought why not glue stick them on.  It won't be washed.  Wow did that make life easier. The glue stick worked to hold the felts pieces while I stitched them on.

 The stars you see on the other side are made from silver lame' that I had already used iron on stabilizer on (from an astronaught halloween costume).  I placed stitch witchery on a piece of freezer paper and then placed the stabilized lame on top and pressed it.  This put the  stitch witchery on the back of the lame'.  I then cut out the stars and peeled off the freezer paper and then ironed them onto the canvas.  It is harder to iron on to canvas than other materials.  You have to heat it longer and for sure don't move it till it's cold.

Voila, I have a mail box cover.  To display it I used a box with an aluminum pan on it and then my sweat hirt to round the top. (You can see it peeking out frm the mail box flag hole.) I also used two yard sticks to support the cover.  As you can see I don't have the straps on it yet.  I think I will use wide elastic with those large flat snaps.  This way it will pull nice and tight on the box.

I figured the flag will hide the cake on the one side so I will tell DD to put it up and put a party hat on it to hide the flag.  Or use the flag to tie balloons from and put a bow over the flag so the postman won't think there is mail in the box.

 
 New Article on my blog: 
"A MYSTERY IN THE MAKING"
A mystery quilt designed with the novice in mind
 
Other blog sites by me:
 
Where I have stories of my cats and other pets
a blog about my courtship with my husband,
and a blog about my most embarrassing moment.
A "Soap box" blog where I do air my opinions.
 
blogs about the wildflowers on our farm
Organic methods we use, some cooking and some poetry,
blogs about Seed sprouting, insects, and garden pictures
Blog about an endangered beneficial beetle
New Blog:
 
All recipes, pictures, and writings are my own.
I give credit for items which belong to other people in my blogs .
Please do not copy without permission
 

Thursday, February 4, 2010

I QUILT AND PIECE

Or should I say I piece and sometimes they get quilted.  This is the story of a UFO.  


Three years ago I decided to raid the stash to make a quilt for my brother.  I had no idea what pattern I would use.  I just knew the colors I needed to look for.  I also knew the pattern I picked needed to blend with a house decorated in the craftsman style (with a modern edge).  This quilt is the size of a large couch throw (appx. 58 X 48)  I found several fabrics that worked well with one another.  There was plentiful yardage in each of the fabrics. 


That is a big problem with using from the stash.  If you pick a pattern that requires a smidgen more than what you have.  I have been known to piece scraps of the fabric that are not big enough to sneeze at to make a 2 inch square to complete a block. 


My brother's home has lots of angular shapes.  I knew a busy pattern wouldn't work.  I also wanted to complete it quickly. the pattern needed to be effective but simple.  The fabrics I pulled were graduated colors of the same type theme.  They were from several manufactuers.  Some of the fabrics had been laying around for 6 years.  The graduated colors had me looking for patterns that would use that to my advantage.  One of the first patterns I came to was the rail fence.  The more I looked I kept coming back to the rail fence.  It is a very easy strip pieced quilt that goes very fast. 

I began the quilt and life got in the way.  It was put in a box and forgotten about.  About 18 months ago I got it back out and finished the center of the quilt.  It went back in the box again.  My internet friend gave me the inspiration to get it out again.  Yesterday I retrieved the quilt and proceeded to pull some border fabrics from the stash and finish the top. 


The above picture is the finished top.  I will need to clean the quilt machine table off before I can quilt it (It has become a depository for magazines, sewing notions, and even yardagages that I haven't washed yet.)  This tells you how long it has been since it has been used. 

The top picture is an enlargement of the corner.  I decided to give the quiltlet a more formal look I would miter the corners. 

The next enlargement  is of the body of the quilt so you could see the fabrics. 

I will post a pix of the finished quilt as soon as I can.  Hopefully very soon.

Monday, February 1, 2010

SPIRIT'S HERE

Finally a picture of one of the thirteen.  This is the kitten we held back, the one who went to a new home and returned.  She is in her favorite place, on the stair landing with the plants.  We put a doll bed out there for her and she loves it.  "Spirit" used to be totally white, as you can see she is changing colors. 

The cactus bloomed The last of october and started blooming again the first week in January.  It seems to like the light there.  The pink celotex is in the window to keep the extreme cold from falling on the musa plant.  It has been below zero night temps for about a month now.

Sunday, January 17, 2010

THE MOTHER OF THEM ALL


This is Dawn The Kitten/Cat who mothered them all.  She is about 9 months old in this picture.  she is fierce.  Mousing is her favorite hobby.  Attacking other cats who infringe on what she considers her territory is her goal each day.  Her territory is anywhere she happens to be.

Saturday, January 16, 2010

SPIRIT RETURNS

As I was leaving, Spirits new home, I told the new owners if they had any questions please call and added if she didn't work out well please call us we would pick her up.  I really didn't think the pick up option would happen or I wouldn't have left her. 

Sometimes my faith in humans is destroyed, sometimes I am upset with myself for misjudging the situation; both had happened this time.   This morning Spirit's new home called for us to pick her up.  They said "Halloween" just wouldn't calm down and leave her alone.  I thanked her for calling and told her I'd be right over to pick her up. 

When I arrived I was shocked.  There wasn't just one cat there that was 8 months old.  There were 3 male cats, all black, all un-nuetered.  The others were Cats not kittens.  The lady had lied by ommision. I would have never left a 5 month old little girl there. 

I picked Spirit up.  She was shaking and then all of a sudden she realized who I was and I received a love rub and she started purring.  Matilda was truly sad to see her go.  Thank goodness she realized she had a situation that wouldn't get any better with time.

When I returned home with Spirit I took her to the bath room and rubbed her down with a wet wash cloth.  I did this for two reasons.  Evidently they smoked.  She reaked of cigaretts and Hunny is allergic to black cats.  No joke, every black cat he has been around causes immediate sneezing, swelling of his eyes and severe itching.

Spirit is in Hunny's Den now.  She is exploring and getting to know where every nook and cranny is.  Tonight we will introduce her to the dog again.  I tried when I got home but she was still so hyper from her experiences the last few days she thought the dog sniffing her was going to kill her. 

Thursday, January 14, 2010

SPIRIT OF LOVE

Spirit's name seemed to fit her even though she didn't seem to care for it. 
She never did respond to it when I called her. She was one of the kittens
from the litter that had hypothermia. From the first when I found her she
was a fighter. She was the first to scramble under Dawn and latch on. As I
remember she was always first under Dawn. She was always the first to jump
up when I came into the room. She was full of vim and vigor.


She was white but not really white she had this veil of beige on the tips of
her fur; giving her a misty appearance. This was the reason I named her
Spirit. As she grew older her feisty independence grew stronger. She wanted
to be first at everything and she was. She was the first to figure out how
to escape over the sides of the nest box.


We knew when the sign went up that if any kitten went first it would be her.
She was gorgeous. No one would even look first at her personality. They
would only notice how beautiful she was. I thought if we were going to have
to raise a kitten (finding homes for the kittens in this economy is hard) we
would pick the one we wanted to keep.


Each week Spirit's coat changed. The beige tips changed to gray in some
places. She still was very white but now she looked like she had a cloud
around her. Her ears became light gray. Her face developed steel gray
tabby stripes on it. Her tail became charcoal gray. Nothing seemed to
take away from her beauty. She was fabulous. Her personality grew too. She
was adventuresome and quite the little prankster.


Each person who came to look said, "Oh, I want that one". I followed with,
"She's already spoken for I am holding her for Christmas." Technically it
wasn't a white lie.


By Christmas all had found homes except her and Winky. Winky's story you
heard in Part two. I was getting ready to give the two a flea treatment and
bring them up to the house to peoplefy them; to teach them manners.


My Hunny called and said he had just gotten a call on the phone for kittens.
I said I wonder who gave them your number. He told me he told her he'd have
me call her back. He said, "I think she's elderly, she said her name was
Matilda." He gave me the name and I sat down to call the lady.


She must have been waiting by the phone. I called from my house phone and
she had no idea of my last name so caller I.D. would not have clued her in
it was I. The phone was answered before the first ring had finished
ringing. She didn't even say hello. She said, "Is this Gloria?"


I told her it was. I asked her if she was the lady that called my Hunny and
she answered yes. (She had gotten the number wrong by one number and it just
happened to be Hunny's number). Her English was halting. I couldn't tell if
she had a foreign accent. She also sounded like my deaf friends who had
never heard a spoken word but learned to speak.


She stated she was elderly and she wanted a boy kitten. I asked her if
there was any special reason she wanted a boy kitten. She replied no and
asked me why I asked. I told her I had only one kitten left, it was one I
had chosen to keep if I couldn't find a good home for it and it was a girl.


In her broken speech she told me they would be a very good home with lots of
love. She told me we have lots of toys for her. She said could you bring
her for us. I asked where they lived and it was less than 3 miles away. I
told her being the ice on our drive was so thick we would bring her around.
I also told her I had already refused a home last week and if we got there
and we decided we should keep her we would bring her back home.


She became very distressed at what I said and reiterated all they had for the
kitty and asked me why I had refused the other people. I told her when I
asked a couple of questions the lady admitted they were from a rescue center
and would be taking her and putting her up for adoption. I told the lady I
was doing that and if I didn't find a home I approved of then her home would
be with us. She answered me, "That would be terrible and so hard on the
kitty having to learn to like another home only to have to leave to go
somewhere else."


After hearing her response, I told her not to worry we would bring Spirit
over to see her when Hunny got home from work.


I proceeded to get directions from her. I realized she did not know if she
was east or west of our road, even though she had seen the sign on our road.
I finally asked her if she turned out of my road which town would she being
going to. It turned out she lived in the mobile home park not too far from
our house.


When Hunny got home I loaded both Winky and Spirit into the cat carrier. I
had just finished treating them for fleas so they wouldn't carry any over to
the people's cat. I forgot to mention as we were finishing the conversation
she said quietly, "We have another cat." I asked her why you want another
one. She answered her kitten was lonely. I can understand that, if our cat
and dog weren't such good friends I would have had another cat too.


The mobile home park is very nice. It has nice wide streets that are paved
with concrete. There are side walks. All the lots have nice size yards.
This park was built in the 60's. It was very subdivision like. Not the
norm for mobile home parks of that era. We meandered down the street
looking for her address. She made it sound like she was the second house on
the street. We went for over two blocks before we came to the right
trailer.


I called her when we left and told her we were coming over. She asked how
long it would take me. I said maybe 5 minutes. You are right around the
corner from us. She replied, "Oh goody, I will wait by the mail box for
you." I told her not to, it was too cold. She reluctantly said okay.


When we drove up she came out of the house lickety split. She hollered,
this is Spirits new home you are here. She had on furry slippers and a thin
blouse and skirt. No sweater not even warm socks. I told her to hurry back
in we'd bring the kittens in a minute. When we brought the carrier in she
squealed, "You brought me 2 kitties, you are so wonderful." I explained to
her that Winky just came along for the ride that he was our kitten and we
didn't want him to be lonesome. I told her when we got home he would be
coming up to live with us at our home, he wouldn't be living in the barn
anymore.


When we came inside I realized the reason for her halting English, She had
Turrets syndrome. She had to hold on to her hand or hold onto something to
keep it from flying all around. When she wasn't nervous (when she picked up
Spirit) her voice returned to a normal cadence and her body stopped shaking.
The trailer inside was sparsely furnished, but very clean. Everything
inside was very old and worn. On the floor in the middle of the living room
was an 8 foot square of carpet. In the middle was the largest assortment of
cat toys you have ever seen. In the middle was a small carpeted cat tower
with a springy toy on top. Against the far wall were 4 water dishes and 4 
very full feed dishes. She said did you notice I got another litter box
just for her. "You are going to let me keep her; I already love her so
much." Her husband said, "We will give her lots of love and she will have
Halloween for a friend." I asked who, and he said that was the name of the
other kitten. We hadn't seen him. All of a sudden as if on cue, out comes
Halloween. He's as black as night.


Matilda is holding Spirit and pleadingly looks at me and says, "Are you sure
we can have her?" I said yes but if you decide you can't care fore her or
she is too much trouble for you, you will call me to come and get her.


When we got in the car I asked Hunny if I did the right thing, I knew the
kitten would probably never see a vet unless she became ill. I knew they
didn't have the finances for all the shots. I also knew from all I saw that
she would not lack for love and would get the best care they could give her.


Matilda called me today and said, "Spirit loves me, thank you so much."