Tuesday, October 23, 2018

MYSTERY QUILT BLOCK CHALLENGE: Block one part two

My Mystery Medallion Challenge Block One is completed.  I would like to say it was a breeze.  It should have been but my fears...and stubbornness lead me to having to recut pieces from the limited amount of fabric I have..

I am terrified of bias edges, I have made flying geese one way my whole quilting life....that is using a square on the rectangle. In the process I get to harvest 1/2 square units. 
   
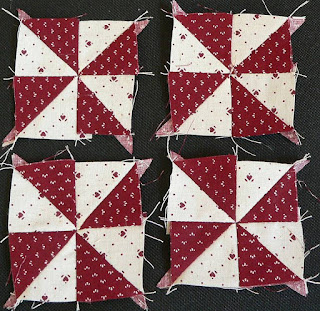
Toby's instructions tell you to take these wonderful 8 3/4" squares and diagonally slice them ...not once but twice...to me that was sacreligious....I stopped reading and cut my rectangles the correct size with the squares the correct size, and proceeded to piece the flying geese.  These are the pinwheels I harvested from not following the instructions. 


Toby does say in the directions at the beginning of this mystery, "read the instructions all the way through before beginning".  No disrespect to Toby, I just had my mind set that I was going to get by without sewing bias edges...and be able to harvest my 1/2 squares..Talk about bull headedness!

When I continued piecing the rest of the geese..I discovered it was a necessity to cut those 8"squares and struggle through the bias edges.  Toby designed the piecing so the bias edges didn't end up on the outside edge of the unit.  Sewing the bias edge on the side of the geese was not difficult.  I made sure I placed the bias piece on top of the nice stable piece.  Then I made sure the pressure on the presser foot was set on low so the seam was not stretched out of shape.  I am no longer biased against sewing on the bias.

Thanks Toby for this very fun "free" adventure.  Thank you for making me indure a part of piecing till I was no longer afraid of it.

BTW Toby....paper piecing is still torture for me.  
Everyone...Toby has a paper piecing way she says is foolproof...Hmmm.........wonder if it is Gloria proof?

Looking forward to this Friday!!! Second clue!!

more blogs by me:
Where I have stories of my cats and other pets
a blog about my courtship with my husband,
and a blog about my most embarrassing moment.
A "Soap box" blog where I do air my opinions.

blogs about the wildflowers on our farm
Organic methods we use, some cooking and some poetry,
blogs about Seed sprouting, insects, and garden pictures
Blog about an endangered beneficial beetle

Chronicling our adventures with a dumped Pit Bull Pup,
 who has become a hidden treasure.

All recipes, pictures, and writings are my own.
I give credit for items which belong to other people in my blogs .
Please do not copy without permission

Monday, October 22, 2018

MYSTERY QUILT BLOCK CHALLENGE: Block one part one

If you are unfamiliar with this internet challenge I hope you will see why I am here.
The following link is your passport to quilting...(at least I hope this is the right link).


The first thing you do when beginning a mystery quilt is to pick your fabrics using the list of requirements.  For me, this time was more difficult than normal.  I am unable to get to my stash so I had to use what fabric was already at hand. (I won't order online...I am one of those people who has to feel and see.  I don't trust my monitor's colors.)  On the left are the fabrics I have chosen.  I only had enough yardages to do the lap size version.  This is another thing in mysteries.  you are able to choose the size of project   you want to work on.


A date is set when you'll receive your instructions.  It can be monthly or weekly.  When you get your instructions read them through ...top to bottom ...before you cut your first piece of fabric.  This is the results of the first installment on the mystery.  I made two versions of the first part because I was unsure which fabrics I wanted in the  center of the block.  My two greens are very close in value.  


I chose this block because of the light flowery feel.  The one above will be a pillow sham to go with the quilt.


When I began construction of this first part I knew I wanted to harvest 1/2 squares from the flying geese.  Toby's instructions do not include the method the squares.  
This is how I made my bonus 1/2 squares 
(the pictures and script are from another blog I wrote):

 BONUS, HALF-SQUARE TRIANGLES:


With a little extra stitching, 
and time, you’ll have a pieced unit to use in another project,salvaging fabric which would normally be wasted. 


Stitch 1/2” away from your previously stitched seam: then press the triangle back to the “ outer point”.  Pressing back to the corner is very important to do before you trim between the two seam lines.  Stitching ½” away results in a bonus ½ Square triangle.  Be careful when you trim the half square triangle off
(cutting between the two seam lines)   that you don't cut your triangle off the front of your unit.


These are the harvested 1/2 squares from part 1  of block one.  I have made them into wheel blocks.  The red ones will be 2 inches when trimmed and the green ones will be 5 1/2 inches when trimmed.  Now I have some orphaned blocks instead of trash fabric.
  

They will probably be incorporated into the finished mystery quilt (maybe in the backing.)

If you indulge yourself in this mystery here are some sites to help you:
The designers blog: This is about the first part of the mystery with techniques for successful piecing of the bloc...and the flying geese units.


Tips on Block one Construction from the group leader Ashley Hough:


I am headed to work on Part two !


more blogs by me:
Where I have stories of my cats and other pets
a blog about my courtship with my husband,
and a blog about my most embarrassing moment.
A "Soap box" blog where I do air my opinions.

blogs about the wildflowers on our farm
Organic methods we use, some cooking and some poetry,
blogs about Seed sprouting, insects, and garden pictures
Blog about an endangered beneficial beetle

Chronicling our adventures with a dumped Pit Bull Pup,
 who has become a hidden treasure.

All recipes, pictures, and writings are my own.
I give credit for items which belong to other people in my blogs .
Please do not copy without permission

Wednesday, July 18, 2018

TREASURE OR TRASH

It's been quite a long time since I have made a post to my blog, much less a creative one. Right now I am stuck using what I have at hand.  Scraps, recycled items , fabric which was already upstairs.  I am unable to get to my stash.  Actually it has been a blessing.  I have learned use it...to the fullest extent...make do with what you have.  (I had 3 quilt tops evolve from a box of scraps).

Last week the buzz on FB was about having sisters, celebrating  being sisters.  My sisters and I are spread all over the United states.  I am mid west, I have one in the great lakes, and one in Florida and one in the Rockies.  We have totally different lifestyles but underneath we are all the same.  We are creative talented people with compassion for everyone.  How do I say it? it needs more than a phone call?  Phone calls are menial things.  Recycle/re-use to the rescue.

I am a saver.  I save things I think will be useful in creating something else. I save things like the bag from 50 lbs of onions.  Why?  Because when we commercial garden it was a reuse for the garden.  Now the bag is clean because I put the collected dryer sheets in it and washed them twice and hung them in the sun to dry, getting rid of that disgusting dryer sheet fake perfume.  (I'm all about zero chemical smells.)

I buy items because the container appeals to me...the contents have to be needed too, but I bought that variety because of the container!

Today I put some of my saves to use:

Dryer sheets
netting from an avocado bag.  
fabric from a pair of my old painter jeans which I milked goats in
from the 70's pieces of fabric too small to even save.  
The last of a polka dotted fabric from the 40's.  
clipped fishes out of junk fabric 
Glue stick so I didn't have pins in the way...
The sewing machine and any old thread...this isn't a love it for two life times project.

If I'd Given it more thought I would have used some of those color catchers in the project.  Remember this is a fl by the seat of your pants project..just doing not planning.

The following are the cards I made to send to my sisters to remind them they are not out of my thoughts no matter how far away they are...and for a full day they were the only thoughts I had on my mind.

This sister was born a star.  She plays the piano and sings, is an Actress and is very active in leading her community through the music world.  This is her card,  constructed of scraps on the dryer sheet.  she has the 40's fabric.


Her matching card:


This sister is into fish and seaside.  Evidently she really likes Nemo too.  This one is also constructed with dryers sheets.  Nemo used a dryer sheet so I didn't have to needle turn applique.  Sewed it on and turned him out and stitched him down.  The "seaweed" like growths are 3D.  You can see the avocado net 
ready to snare "Nemo" if he gets careless.  Here is the envy to send it to its destination.


The white fabric is the old painters jeans from the 70's using the scraps I had to frame it and make and Israeli flag

Luckily in the back of the drawer I had a blue sharpie.  I never use blue...but sure glad it was there.  


The envy isn't fancy, but it was fun thinking and creating mementoes for my sisters. They may or may not keep them, but they will know this day when the internet was abuzz with sisterly stuff, they were on my mind, I was wishing we could sit down together  and enjoy the laughter which goes with being sisters.

more blogs by me:
Where I have stories of my cats and other pets
a blog about my courtship with my husband,
and a blog about my most embarrassing moment.
A "Soap box" blog where I do air my opinions.

blogs about the wildflowers on our farm
Organic methods we use, some cooking and some poetry,
blogs about Seed sprouting, insects, and garden pictures
Blog about an endangered beneficial beetle

Chronicling our adventures with a dumped Pit Bull Pup,
 who has become a hidden treasure.

All recipes, pictures, and writings are my own.
I give credit for items which belong to other people in my blogs .
Please do not copy without permission



Saturday, March 24, 2018

RAG QUILTS: A CUDDLE COVER

Pink rag quilt after clipping, then shaken hard.
not washed yet
If you look at the labels on the right and scroll down, you will see one which is titled "Sewing: Rag quilting".  Click on it, you will have five blogs about the subject.   There are instructions, where you could pick up and do it yourself even if you have never done any quilting (piecing).  I am sure on Youtube there are many tutorials, and the internet is filled with blogs on the subject.  

My Daughter told me her BFF was pregnant.  I immediately asked her if she wanted a "Shaggy" for her baby.  It was a resounding yes.  I can't tell you how many of these I have made for infants, big kids and adults (over 100).  They are the ultimate "CUDDLE COVER".  They wear like iron, go through zillions of washes, only getting softer each time.  They are not treasure quilts, even though I know they are treasured.

It has been at least 5 years since I have made one.  I made a sample to refresh my memory, to decide my preference of seam depth, stitch length and other particulars.  (The sample will go to a local women's charity.)

A shaggy can be made with  all sizes of flannel squares.  The original pattern made the scene in the 90's. It was made with 8 1/2 inch squares stitched together  with 1" seams, and clipped with 1/4" wide ragging, and had 6 1/2" square batting inside.  I have 6 inch squares leftover from the previous rag quilts I made.  I had enough coordinating squares to make an infant quilt.  180 makes a rectangle, and 200 makes a square.

Ready to be clipped
What did I find?  It is nice to have a stash of precut squares.  You can dive in right away.  I was reminded what fun they are to make.  It is totally mindless sewing.  You don't have to worry if you get a crimp in the seam. Why, it's unwashed flannel and when washed, it will tighten up, the crimp will join the multitudinous wrinkles.

On this quilt I used 1/2 inch seams and clipped 1/8" and closer for the ragging.  I found this gives a chenille look after washing.  The larger seam with larger spacing of clipping gives the "rag" look.

Remember this back is made from leftovers.
It isn't a planned back. 
When choosing colors I have found using the same color in all squares on the side you have your exposed seams is very pleasing.  I pick fabrics for the back which complement the front color.  (You can make a checkerboard on the back.)  When clipped the colors show on the front in a pastel version of those on the back.  In my blogs are several examples.

Most versions have batting in between the squares.  The quilt which I am making for DD's friend is going to Florida so it does not need batting.  When joining the squares, you stitch across the diagonal of the square twice.  I use the number 3 setting on my machine for for stitch length.  It is not necessary to have close stitches here because this is not a stress point.  The stitching is to keep the squares together and to hold any batting in place.  You can use thread colored different from the fabric.  It makes a great accent  on the blocks.  The quilt looks like you quilted it on the diagonal when you finish joining all the blocks.  BTW, I am not a thread snob, but I encourage you to only use new thread.  Thread from granny's sewing box is not strong  enough for these seams.

Very  important, before clipping,  sew around the entire perimeter with #2 stitch or less.  Make this row of stitching 1" in,  sew parallel to the edge completely around the quilt.

When Stitching the seams I use #2 length.  The seams take a lot of abuse when they are washed because of the weight of the flannel.  When you are washing it the first few times you should take it outside to shake the "S" out of it.  This wet shaking is very stressful on the joinings of the blankie and on you!  Believe me when I say, this moment is when you wished you hadn't made a king size with cotton batting.  A word of caution:  Wash the quilt at the laundromat with several towels.   The lint will stop up your front loader very quickly.

When you sew a cross seam it is a good idea to bar tack at every crossing.  This is where you are going to get real stress in the everyday use.  It is almost impossible to repair a seam which splits open after it has been washed.  I have done it by straightening the ragged fibers with the iron, and encasing them in the clear packing tape and then sewing on  top of the tape.

When you  clip be sure to not clip into the seam. Clip close to the seam stitching without clipping into it.  If  you are filled with trepidation about using expensive flannels for this, use old flannel pj's, nighties, sheets etc. cut them up.  They make a great throw, and if you don't need a throw you have an instant pet cover or picnic blanket. See this blog:

The quilt above won't be washed till next week.  I'll post a pic after.

more blogs by me:
Where I have stories of my cats and other pets
a blog about my courtship with my husband,
and a blog about my most embarrassing moment.
A "Soap box" blog where I do air my opinions.

blogs about the wildflowers on our farm
Organic methods we use, some cooking and some poetry,
blogs about Seed sprouting, insects, and garden pictures
Blog about an endangered beneficial beetle

Chronicling our adventures with a dumped Pit Bull Pup,
 who has become a hidden treasure.

All recipes, pictures, and writings are my own.
I give credit for items which belong to other people in my blogs .
Please do not copy without permission


Tuesday, February 20, 2018

GLASS CASES and CELL PHONES

You know how we inherit stuff.  At the time we don't know what to do with it.  We usually end up pitching it, donating it or putting it in a box in the basement for our children to deal with.  Which is what we did with boxes of stuff when we lost relatives.  

Recently I opened one of those boxes and it contained wallets, glass cases, pill boxes, and other stuff that was usually the contents of a lady's purse in the sixties, seventies and eighties.

At the time I was delving in the box my cell phone rang.  When I hung it up I sat it down on my right , next to one of the glass cases.  When I went to retrieve it I realized it would probably fit in it.  Voila! it did, and it also fit in all but one of the cases.  

Looking in the photo you can see I am very hard on cell phones (the outer case has long since bit the dust) and you see the protective clear shield is cracked and peeling off.  I tried it on the phone and it slips neatly in my pocket, protecting it's contents.

The cell phone made a trash into a treasure, keeping it out of the dump.  "recycle - re use"

more blogs by me:
Where I have stories of my cats and other pets
a blog about my courtship with my husband,
and a blog about my most embarrassing moment.
A "Soap box" blog where I do air my opinions.

blogs about the wildflowers on our farm
Organic methods we use, some cooking and some poetry,
blogs about Seed sprouting, insects, and garden pictures
Blog about an endangered beneficial beetle

Chronicling our adventures with a dumped Pit Bull Pup,
 who has become a hidden treasure.

All recipes, pictures, and writings are my own.
I give credit for items which belong to other people in my blogs .
Please do not copy without permission